Thursday, April 8, 2021

The $50 Home Makeover


Like a lot of people who ended up at home during the lockdown of 2020, I became quite restless. I am a doer & that didn't subside while my doing couldn't be done. Instead of being able to do things outside my home, I turned to doing things for my home. Idle hands and all...

During quarantine, we had already repainted our living area, gave my youngest daughter's bedroom a new look with a fun accent wall and updated our den with a shiplap half wall & more industrial theme. You'd think that would have kept me busy enough to scratch the "doers" itch, but it didn't, so I was always looking for another project to tackle. It was therapy. A way to "escape" the heaviness around us.


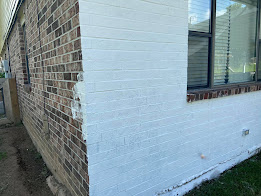
I've never loved the color of the brick on our home. I mean, it was fine, but it was dark & didn't reflect at all what to expect when you came inside, which is light, airy & full of greys & blues. A color palette & feel we hope brings a coziness to our guests. It was also VERY 1980 Ranch. Which is great...for 1980. But not for us, now. 

Meh. 😂

But, I mean, what could I do about that? I'd researched painting the brick before, but there were a couple of hang ups for me. The first being that painting brick can be potentially harmful to the brick itself & cause it to deteriorate. The second was cost. If you know me, value is a big deal to me. (I feel like this is a much nicer label than cheap or even frugal). The cost to have brick painted or even do it yourself isn't small. And then what if I hated it? There would be no turning back & I'd be stuck.

Which is what sent me on a road to Pinterest. Pinterest, in my opinion, is the mecca of all things "How can I get what I want without paying a bunch for it". The DIY'ers goldmine.

And what I found has had a massive impact on the look of our home and has probably brought you to this blog to see how you can do the same for yours, so I'm here to share my new found smarts with you.

What I found was a process for white washing brick using Hydrated Lime. NOT the hydrated lime you would use in your garden. This is a SUPER important thing to know. I'm talking about Hydrated Lime masons use in doing concrete or brick work. We will talk more about that in a minute. 

I read about another bloggers experience white washing their brick using this method. (I would have linked her process here, but it looks as if her blog is no longer active).

She shared her before & after pics, her tips & that the whole project only cost them about $50. 

WHAT!? ONLY $50?!!!!! 

SOLD!

It took a few more days to read up on this process &, let's be honest, talk my husband into letting me try it.  I think what sold him was the minimal cost & that if we hated the outcome, we could power wash it off within a day or two & it would be like it never happened. My guess is he figured it would at least keep be busy for a couple of days so I wouldn't come up with another project instead. ;) 

So I masked up & headed out to find my supplies.

Here is what I needed:


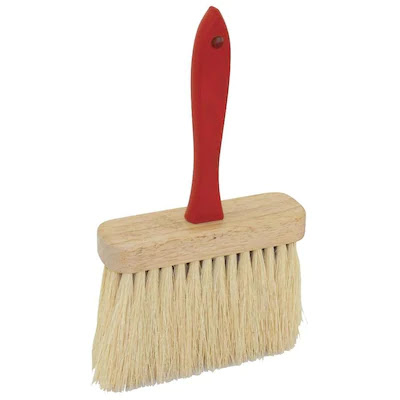
  • Masonry Brush - $7.50 from Lowes. I recommend picking one with bristles that are soft & not plastic like. We bought both & the application was much easier with the softer brush
  • A 50lb bag of Hydrated Lime $20 from Yeager's hardware store (Our Lowes & Home Depot didn't have any. Again, NOT garden Lime. You want what is meant for concrete/masonry)
  • 5 gallon bucket for mixing
  • Water 
  • Gloves - I didn't wear them on day 1 & realized at the end of the day why I should of. It will irritate your skin & you won't feel it until you've cleaned up & see red blotches that 
  • Protective eye wear - for the same reason as wearing gloves. The hydrated lime is caustic, so while it won't feel like it's in there or burn, it can cause damage if it gets in your peepers, so just protect them, mmk?
An additional tool we bough was an attachment for a drill to mix the solution in the bucket, which is what pushes our project total to $50. Otherwise, we'd be just around $30. This is optional and is helpful, but not 100% a must. 
We also recommend power washing your brick to clean it well a day or two before you are going to white wash it. We already had one, so that was not an additional cost. 

The Application Process- 

As I just mentioned, I recommend power washing your brick to make sure any dirt or debris is off of it before white washing to make sure you get the best coverage possible.

    1. You'll start by mixing your solution. If you want a solid white look to your brick, you'll mix your solution with a 1:1 ratio. Meaning, 1 cup of lime to 1 cup of water. Mix well until full combined.

TIP: We made our batches 4 cups at a time (4 cups lime to 4 cups of water) so didn't have to mix new batches as often. 

    If you want a thinner, more transparent finish so some of your brick shows, you'll simply dilute it with more water. I would definitely make sure you're keeping up with measurements so your ratio stays consistent through the process. You might even test a small section of bricks with different ratios, letting it dry for a few hours & seeing which you like best. We wanted an opaque finish, so 1:1 was the solution for us.


    2. Working a section at a time, wet your brick well with water. Dip your masonry brush into your solution and starting at the top, wipe it onto the brick. This is a sloppy process but SOOOO easy!
Cover your brick, using the bristles to help get into the nooks and crannies, down to the bottom of that section.


    3. Repeat this process for each section, working your way around the house, overlapping the last section just a little. Remember, wet your brick then wipe on your solution top to bottom.

Now, listen. This won't look like much when it's wet. Here is what I mean-


You will think you need to go over it again or add more. Don't. Let it dry.
As the solution dries into the brick, it will become more opaque i.e. solid. You can also go back and do another coat once it is dry if it isn't as solid as you'd like. Just be patient with the process. 
    
After 1 coat of a 1:1 ratio


Cleaning up your tools is this easy as well. Simply spray everything down with water & wash it out. 

If, after you've let everything dry, you hate it. Don't worry! As long as you take a power washer to is within a couple of days, you SHOULD be able to remove all signs of your project and go back to your original look. I'm not going to promise it, because I don't want that liability, but it should wash right off. 


                                               Before                               After drying, but before distressing


Adding some character- 

Once you've done your whole house, you can then decide if you want to keep it solid or go back and add in some brick "distressing" to add a little more character.
I tried a few different techniques for this trying to get the right look & what I found to be the best method was a dish scrubbing brush and water. I dipped the brush in the water and went over the brick to basically scrub away the white wash. I did them singularly and in groups to give a "worn" look. There is no real pattern and some brick has more distressing than others, but that's the point, right?


Some final tips-

A few of other notes that I would share with you that we learned along the way would be these...

  • Having a second person to be one step ahead of you is SUPER helpful. My husband would stay ahead of me and take care of things like moving anything in the way or pre wetting the brick. This allowed me to just keep moving along. 
  • If you drip on a surface you don't want white wash on, don't fret. On things like windows, it cleans easily with paper towels and water. On concrete, like your porch, you can pour water on it quickly to dilute it thin enough to wash off or, if you're like us, and let it set for...a couple of weeks, a quick spray of the power washer lifted it right out. 
  • When the brick gets wet from rain or any other water source, it will become transparent. This doesn't mean it's ruined. Once it dries, it will go back to normal.  We have found in a few spots, where runoff from rain hits the rock or concrete next to the house and bounces hard back up on the brick that we have some wear happening. We will fix this by doing a touch up coat of white wash & putting some landscaping down to prevent any further wear. Easy peasy.

That's it! That's all there is to it! It really is THAT simple and man, the final look is chef's kiss!
Your "new" brick should last around 5-7 years before needing to be touched up. During that time, it will just gradually, lightly fade. You might even enjoy that look too! 


In my opinion, for the outcome we got and how easy the process was, needing a touch up in 5-7 years is totally worth it! We have had SO many wonderful compliments on how it has totally changed the look of our 1980's Ranch style house & it feels even better knowing it was such an inexpensive and simple project to take on. We are 6 months in at this point & are still looking snazzy!


                Back Porch before white wash                                                 After white wash 

This $50 project totally turned into a "If you give a mouse a cookie" situation, but those are blogs for another day. 😆 White washing the brick totally inspired some other changes, so be prepared for that too. 😂


We ended up painting our roof. Yes, painted it, (using Behr Roof Paint ) to be more cohesive with the white & also replaced  the old, stained vinyl siding from cream to grey. We also totally demo'd the roof on the back porch & replaced it with a whole new add on to our home. I'll share that update in another blog post. It's AWESOME! 

BEFORE:


AFTER:


Have questions? Ask away! 

-Amanda